Phone Hours
Monday–Friday 8:30am–8pm EST
Saturday 8am–3pm EST
Sunday Closed
Swing sets are a childhood staple. Flash back to your youthful memories by adding one to your backyard. You can pass on those old feelings of youthful freedom to your children. But instead of buying one, make one. I guarantee you; this one will be more appealing and satisfying than a store bought set. This guide will show you how to build a swing set and climbing wall made of Advantage Ipe, the most durable hardwood on the market.
| Part | Qty. | Size |
|---|---|---|
| Legs | 6 | 4x4x96" |
| Beam | 1 | 4x6x168" |
| Braces | 3 | 2x6 cut to fit |
| Climbing wall base | 1 | 2x6x54" |

A.) Place a steel A-frame bracket at the top of a 4x4 leg so the inside of the leg is flush with the top of the bracket. (The outside of the leg will stick out over the top of the bracket.) Attach the bracket using 10d stainless steel nails. Insert a second leg into the bracket and fasten it in place using 10d nails.
B.) Turn the legs over and fasten a truss bracket at the top of the legs opposite the A-frame bracket using ¼ x 2" lag screws driven through pilot holes.
C.) Turn the leg assembly over so the truss bracket is facing down. Measure 48" from the bottom of each leg and make a mark. Place a 2x6 brace across the legs with the top of the brace flush with the marks. Draw a line along each end of the brace where it crosses the outsides of the legs. Cut the brace at the lines using a circular saw.
D.) Clamp the brace to the legs at the marks, flush with the outsides of the legs. Drill two 3/8" holes at each end of the brace, offsetting the holes. Drill all the way through the legs. Turn the frame over. Using the holes as a guide, drill ½"-deep recesses into the legs using a 1" spade bit. Insert 3/8 x5" stainless steel carriage bolts through the holes from the brace side. Place a washer and nut on the end of each bolt in the recesses. Tighten the nuts using a ratchet wrench.
E.) Cut the top of the legs flush with the top of the A-frame and truss brackets using a reciprocating saw.
F.) Repeat steps A through E to build another A-frame. Build a third one with an A-frame bracket on both sides of the leg assembly.
A.) On the 4x6 beam, mark the locations for the swing hangers. From the end of the beam, mark the bottom of the beam at 18", 36", 50", 68", 82", and 100".
B.) Drill a 5/16" hole at each of the marks, centered from front to back. Insert a 5/16 x7" swing hanger unit into each hole so the nailing plate covers the hook at the end of the hanger. Fasten a washer and nut on the end of each bolt using a ratchet wrench. Attach the nailing plate to the beam using 8d stainless steel nails.
C.) Measuring from the same end of the beam as in step A, make a mark for the middle leg assembly at 110 ½ and 114". Make a mark on the face of the beam at 121 ½", 137 ½", and 153 ½" for the climbing wall.
D.) Drill ¼" holes at the marks for the climbing wall 2" from the bottom edge of the beam. Insert ¼ x 4" eye bolts through the holes and fasten them with washers and nuts.
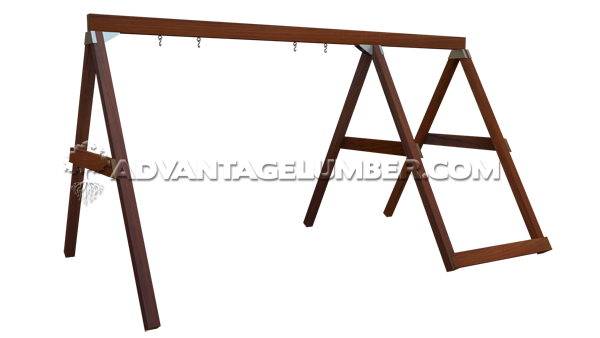
A.) Drive two fence stakes in the ground 164" apart at the location you want to place the swing set. Stand an A-frame leg assembly with truss bracket in front of a stake (this is the swing set end) and the leg assembly with A-frame brackets on both sides in front of the other stake (this is the climbing wall end). Make sure the A-frames are level. The leg assemblies should be parallel with each other. Tie the assemblies to the stakes using thick string or wire.
B.) Place the beam on top of the brackets on the leg assemblies. Center the beam so the ends overhang the outsides of the leg assemblies by 3 ½".
C.) Fasten the beam in place by drilling pilot holes through the truss bracket and A-frame brackets and inserting ¼ x 2" lag screws.
D.) Place the remaining leg assembly between the 110 ½ and 114" marks so the truss bracket faces the swing set side. Drill pilot holes through the truss bracket and insert ¼ x2" lag screws.
E.) Measure from one end of the climbing wall base and make a mark at 11", 21 ½", 32", and 43". Drill a ¾" hole at each mark, centered from top to bottom. Note: The climbing wall has three connections at the top, but four at the bottom.
F.) Clamp the climbing wall base to the bottom front of the two legs that sit on either side of the climbing wall. Align the base with the bottoms and the sides of the legs. Drill two 3/8" holes at both ends of the base through the legs, staggering the holes. Drill all the way through the legs. Insert a 3/8 x 6" stainless steel carriage bolt through each hole and tighten a washer and nut on the end of each bolt.
A.) Attach the swings and gym rings to the swing hangers, adjusting the chains so the accessories are level and at a proper height. Once the swings and gym rings are in place, use pliers to crimp the S-hooks on the hangers closed.
B.) Attach the top of the climbing net to the eye bolts on the beams. Fasten the bottom of the net to the climbing wall base by inserting the loose ends of the rope through the holes in the base, pulling the rope tight, then tying the ends in knots.
A.) Fasten the anchor bracket approximately 2" from the bottom of a leg using the screw that came with the bracket.
B.) Drive the auger anchor into the ground an appropriate distance from the bracket. Once the anchor is firmly planted in the ground, connect it to the anchor bracket. Do this for all six legs to help ground the structure.
Your swing set is complete and ready for playtime! Since you chose to use such a sturdy material, you will never have to worry about your children being unsafe when playing. Make sure you check out our other DIY tutorials for more fun and exciting projects.