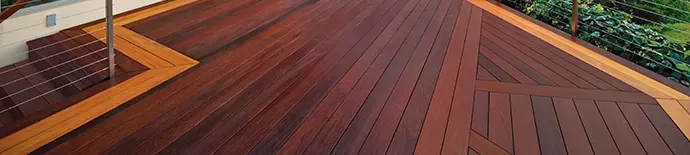
V-Groove Siding Installation
Easy to follow installation instructions for wood siding products from Advantage Lumber, LLC.
Prior to Installation
Always check with local building codes and an architect prior to constructing. Follow all building codes that apply in your area. Since there are many different variables one can encounter on an installation project, it is your responsibility to test the material for suitability for your project prior to constructing. Follow all manufacturers' installation instructions for the individual products used on the project. If any building codes or manufacturers installation instructions contradict or differ from information provided by AdvantageLumber.com, contact us for written clarification prior to starting your project.
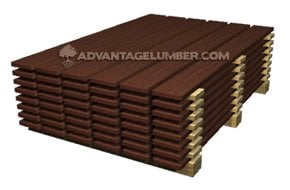
Storage and Handling:
Hardwood siding should be allowed to sit where it will be installed for 7 days prior to installation in order to get acclimated to your local temperature and humidity levels. DO NOT store the siding directly on the ground, or directly on top of a concrete surface. DO NOT store the material for more than 30 days prior to use without first consulting with a sales rep at advantagelumber.com that your storage conditions are optimal. The siding should be elevated at least 12" off the ground during acclimation. To ensure the bottom boards are well ventilated, place the decking on top of blocks of wood. DO NOT cover siding material with plastic or a tarp during this acclimation period. Covering with a tarp/plastic will trap moisture in and cause stability issues. Covering the top of the pile with a sheet of plywood to shed the water is recommended. Keep material dry until installation. Also keep stickers (or wood shims) between layers of boards to allow proper air flow (see image below). DO NOT store the material in a garage or any other enclosed area.
How to Install V-Groove Siding
Every project is unique. To ensure your siding installation goes smoothly and is long-lasting, we've provided a set of general guidelines to help you. Remember, these are guidelines only. Please consult your local building codes, or a professional siding installer in your area. Consulting your local building department, or HOA prior to starting exterior renovations to either a residential, or commercial building should be a required step prior to installation. If you have any questions about this How-To Install Wood SIding guide, give us a call. We'd love to help.
V-Groove Siding Installation Pictures
 |
How to Install Advantage V-Groove Siding
MATERIALS NEEDED
- Advantage V-Groove Siding
- Stainless Steel Screws
- Cordless Drill
- End Seal
- Furring Strips (1x3 pine is typical)
- Base board (1x6 PT Pine is typical)
- Vapor Barrier
- Level
- Rubber mallet
- Chalk line
PRIOR TO INSTALLATION
- Calculate how much siding you will need based on the "Net Finished Dimensions" only.
- Advantage V-Groove Siding must acclimate to your local climate.
- Use DeckWise End Seal to cover the ends of the grain of any freshly cut siding boards.
- Do you need a permit? Permission from your Homeowner's Association? Before starting any project, you must always check local building codes.
STEP-BY-STEP INSTALLATION GUIDE
- Install house wrap to prevent moisture intrusion. (Always follow the vapor barrier manufacturer's instructions.)
- Install the baseboard (horizontal furring strip) with stainless screws. Ensure the baseboard is level.
- Align furring strips vertically on top of baseboard 16" on center. Attach furring strips.
- Install the first V-Groove Siding board starting from the bottom baseboard with the tongue facing upward. (TIP: Use a level to ensure this first board is aligned properly). Do not install with the groove facing upward as this can trap water in the groove and cause the wood to swell.
- Pre-drill screw holes with a ⅛” drill bit going downward at a 45 degree angle through the tongue of the V-Groove siding board. Repeat this step for each furring strip that was installed 16” on center.
- Drive stainless steel screws through the pre-drilled screw holes into the furring strips at a 45 degree angle.
- Set the proceeding siding boards on top of the previously installed siding board. (TIP: Use a rubber mallet to align boards tightly and properly). The groove should slide on top of the tongue that should be facing upward.
TIP: The screws driven through the tongue of the V-Groove siding boards should be recessed enough so the next board slides right over the tongue. Don’t drive the screw too far so it pulls through the board and is no longer securing the siding to the furring strip.
Please CONTACT US if you have a specific request.
Allowable Shrinkage:
When installing V-Groove Siding, install each board as tightly as possible to leave the smallest gaps between them in case shrinkage occurs. Average shrinkage is 1/8” on 4” wide boards and ¼” on 6” wide boards. Shrinkage varies depending on climate, installation site, and method of use.
Cutting & Drilling:
Due to the very hard nature of V-Groove Siding, premium carbide tipped saw blades are recommended for cutting. Brad point drill bits or fostner bits provide cleaner holes than standard HSS twist bits.
End Sealing:
Our V-Groove Siding is shipped with the end grain sealed with a clear wax to prevent any end checking and adverse movement. Fresh cuts should be sealed within 24hrs with end grain sealant. We sell end grain sealant by the quart, which is typically enough for 500 sq.ft. of siding. The end grain sealant is simply applied with a paintbrush and dries clear. DO NOT apply end seal to the surface of the siding. Any sealant that gets on the surface should be wiped off immediately.
Finishing:
Because of Exotic Hardwood's natural density and alkaline characteristics, many oil and water based finishes will not dry properly when applied. We recommend that you test any product on several sample boards to determine compatibility. The finish we sell and recommend is Ipe Oil™. We do not recommend the use of other finishes. Applying a finish approximately every two years (depending upon your local climate) can help keep the beautiful dark brown color. If you decide to let your deck weather, it will turn a silvery gray similar to teak. We recommend that you apply a coat of finish initially after deck installation, regardless of the final color desired. This can help ensure that the Ipe retains its oils and stability. For low ventilation applications, we recommend finishing deck boards on all four sides prior to installation but after acclimation.
***IMPORTANT DISCLAIMER***
You must contact your local building department before you begin designing your project. Your local building department (and/or Homeowner Association) will inform you of any zoning ordinances and buildings codes that specify where and how you can build. You are responsible for applying for and obtaining any and all required permits for your project.Advantage Lumber, LLC provides this information as possible suggestions only and will not be held liable for your project's suitability or should you choose not to obtain the required permits, or if you fail to comply with all zoning ordinances and building codes.
Conclusion:
If you have any questions, contact us for written clarification prior to starting your project.
By purchasing material from AdvantageLumber.com, you agree to comply with our Terms & Conditions.